You got a new phone? Its time to swap your esim to new phone.
Transferring an eSIM is different from a physical SIM because you can’t just move a chip. It’s best to explain this as a “Digital Swap”
The process depends on brand (e.g., iPhone to iPhone) or switching platforms (e.g., Android to iPhone).
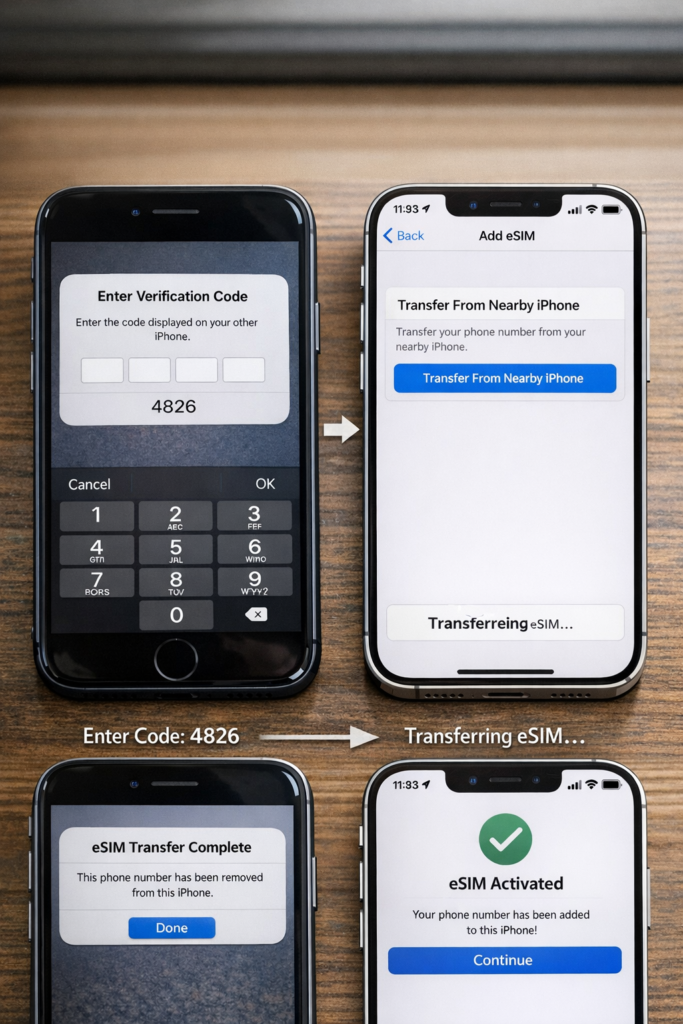
1. iPhone to iPhone (The Easiest Way)
Apple has a feature called “eSIM Quick Transfer” that uses Bluetooth.
- Step 1: Place both iPhones next to each other.
- Step 2: On the new iPhone, go to Settings > Cellular > Add eSIM.
- Step 3: Choose “Transfer From Nearby iPhone.”
- Step 4: A verification code will appear on the new phone; enter it on the old phone.
- Step 5: The eSIM will deactivate on the old phone and activate on the new one instantly.
2. Android to Android
Transferring an eSIM between Android devices has become much easier with recent updates, but its vary depending on whether you are using a Samsung Galaxy, a Google Pixel, or another brand.
Method 1: Direct Transfer (Samsung to Samsung)
Samsung has a built-in “Instant Transfer” tool that works between Galaxy devices.
- On your NEW phone: Go to Settings > Connections > SIM manager.
- Tap Add eSIM > Transfer SIM from another device.
- On your OLD phone: A pop-up will appear. Tap Transfer.
- On your NEW phone: Enter the 6-digit verification code shown on the old device.
- Follow the prompts to select your number and complete the download.
Method 2: Direct Transfer (Google Pixel to Pixel)
Google Pixels (Android 14+) support a similar native transfer.
- On your NEW Pixel: Go to Settings > Network & internet > SIMs > Add SIM.
- Tap Transfer SIM from another device.
- On your OLD Pixel: Unlock the phone and place it next to the new one.
- Follow the on-screen instructions to approve the transfer and scan any QR codes generated.
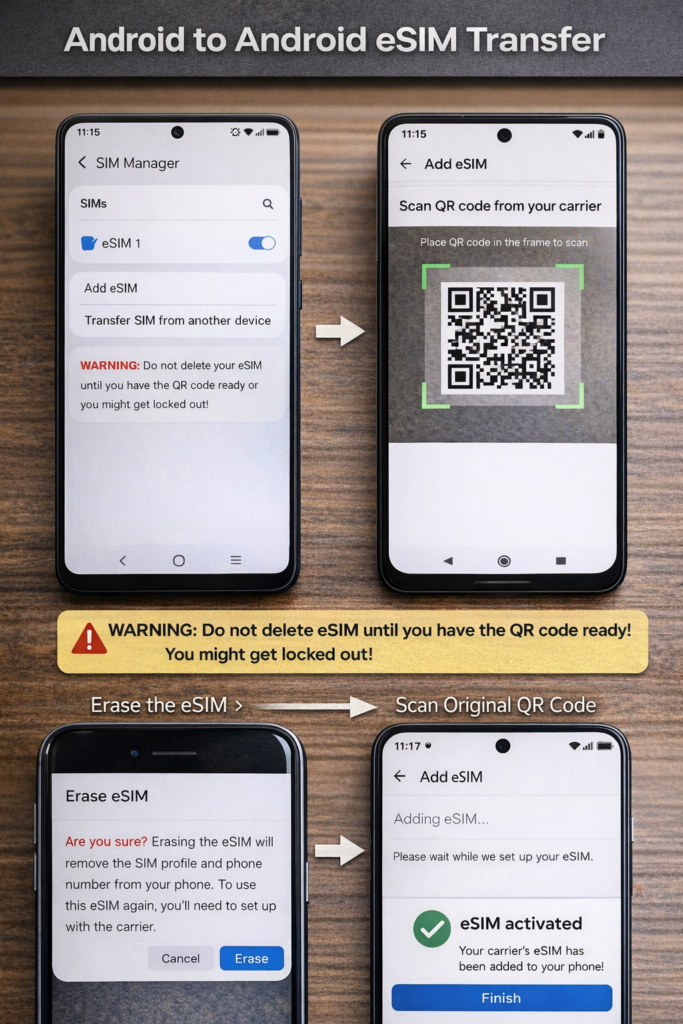
Method 3: The QR Code Method (Universal)
If you are switching brands (e.g., Samsung to Pixel) or your carrier doesn’t support direct transfer, you will need to use a QR code.
- Check with your Carrier: Most carriers (like Verizon, T-Mobile, Jio, or Airtel) require you to “release” the eSIM. You may need to use their app or website to request a new QR code for your new IMEI.
- Remove from OLD phone: Go to SIM settings on your old phone and select Remove or Erase eSIM.
- Warning: Do not do this until you have the new QR code or confirmation from your carrier.
- On your NEW phone:
- Go to Settings > Network & internet (or Connections) > SIM manager.
- Tap Add eSIM > Scan QR code.
- Scan the code provided by your carrier and wait for activation.
Important Tips for a Smooth Transfer
- Stable Wi-Fi: Both phones must be connected to a strong Wi-Fi network throughout the process.
- Don’t Factory Reset yet: Do not wipe your old phone until you have verified that calls and data are working on the new one.
- Carrier Specifics: Some carriers (like AT&T or Vodafone ) might require you to log into their official app on the new device to “download” the eSIM profile directly.
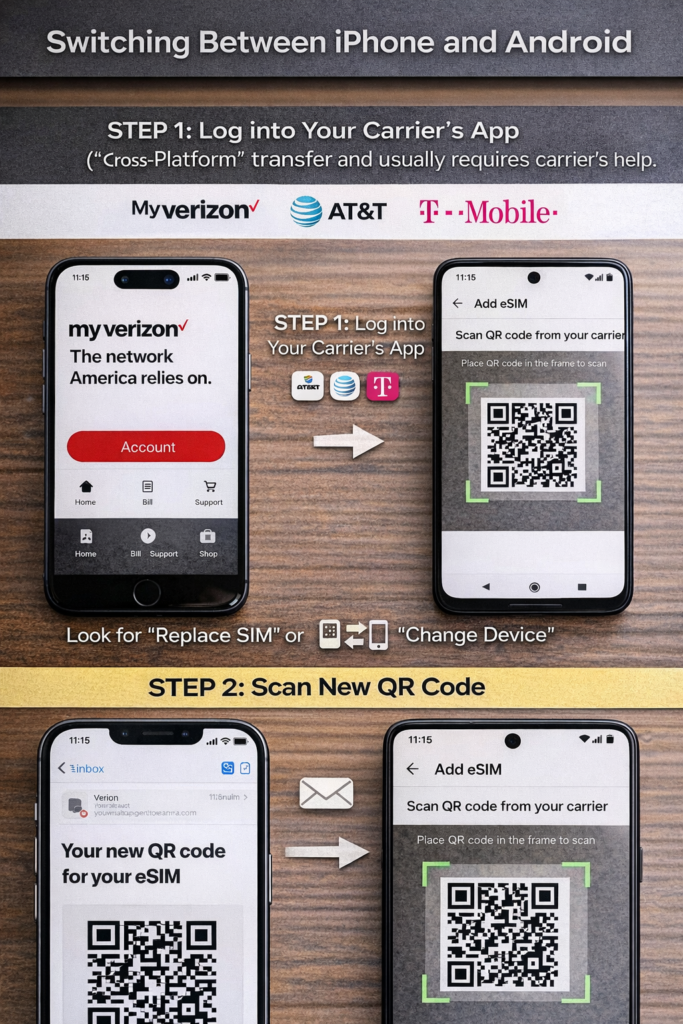
3. Switching Between iPhone and Android
This is a “Cross-Platform” transfer and usually requires the carrier’s help.
- Step 1: Log into your carrier’s app (like My Verizon, AT&T, or T-Mobile) on the new phone.
- Step 2: Look for “Replace SIM” or “Change Device.”
- Step 3: The carrier will email you a new QR code.
- Step 4: Scan that code on your new device settings.
4. What if the old phone is broken or lost?
- You cannot do a self-transfer.
- You must contact the carrier’s customer support or visit a store.
- The carrier will verify their identity and “push” a new eSIM profile to the new phone’s IMEI/EID number.
Warning: “Before You Transfer” Checklist
- Update Software: Make sure both phones are on the latest OS (iOS 18+ or Android 15+).
- Wi-Fi is Required: You cannot transfer an eSIM using mobile data; you must be on Wi-Fi.
- Carrier Unlocked: Ensure the new phone isn’t locked to a different network.